Britney Spears Big Fat Bass Backdrop Making Of
Here is the full version with more images.
Last year we did some background animations for Britney Spears Femme Fatale Tour, the first number we worked on was for the song Big Fat Bass.
Here is a quick explanation of the methods i used to get animations and renders done in a very short deadline time frame required by the client without loosing the quality and look expected for the show. We used 3ds Max 2011 with Mental Ray and After Effects CS5 through the whole process.
Modeling
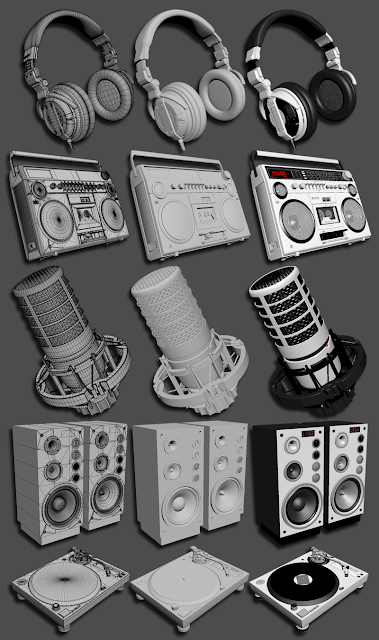
Probably the most straightforward part of the process was the model assets creation. The client had very well defined what elements had to appear constantly throughout the number so most of the work was put into look developement. Some objects were modified from stock library and others were created specifically for the show, specially the sound panel Environment. Everything was handled as Editable Poly in Max.
Environment, Lights, Materials and Rendering
After the models were approved and ready, the look development process started. We needed to have the look of the overall piece done and agreed by the client before we could start to set up the final scenes. We needed really fast render times, and be able to manage the look in a very flexible way. Mental ray was the tool of choice because it allowed a lot of different “hacks” that produced really nice and fast images.
We didn't aim for Hyper Photorealistic images, but we also didn't want it to look like it was from 1980. We had to achieve a sweet spot between credible physical look and a fantasy sexy dreamy mood.
Probably the most useful trick to get fast renders was the ambient approach. I knew that lighting a scene with final gather would slow the process because of the FG map precalculation, so i used ambient occlusion shaders to simulate the effect that final gather would give for ambient lighting.
The technique is not known by many people but it is used by some. Here is a video explaining how to fake ambient lighting in 3ds Max with ambient occlusion. Basically you put an ambient occlusion shader on a standard omni light as a projector map or a mr light shader so you globally add ambient occlusion to your scene and illuminate the ambient with the bright color slot of the ambient occlusion shader. Its a nice method to add fast ambient lighting to the scene but it can be really flat and boring compared to what you get with final gather, so i expanded the idea a bit to give it more tones of ambient color with an hdr as one would do with final gather.

Instead of just adding the ambient occlusion shader to the light i used a composite map to blend two different occlusion shaders. The first one creates the ambient light colors and no occlusion shadows. The second one is a regular ambient occlusion shader used to produce shadow on contact areas.
The trick for the first occlusion shader to only produce ambient lighting color is to set its samples and spread to 0.0 and the max distance value to the minimum possible but not 0.0. Inside the bright color slot i added an hdr image, that image was a regular map that one would use for reflections but blurred with hdr shop Diffuse Spherical Harmonics plugin to make it really smooth and still perfectly spherical without seams. When used as Spherical Environment it produces ambient illumination very similar to final gather but without bounces and extra calculation time, also no flicker.
When you multiply the second occlusion shader over the first inside a composite map and plug that to the ambient light you get the full effect of hdr colored ambient light with occlusion shadows. Last step was to add the key light and some little red lights for the little bulbs on some objects. Parameters for the keylight are simple, just a regular omni light that uses area shadows and has some decay.

The same environment image but without blur was used for reflections. To get the most out of it, and to get reflections to work really fast, i limited the ray distance. That way objects reflect other objects that are only close and if there is nothing else beyond that distance it reflects the hdr environment map.

When using reflection glossiness, hdr maps tend to cause a lot of grain. The environment blur shader was used to avoid that. It blurs the environment image to avoid grain, but it does that taking into account the amount of glossiness the material has, so it is a global solution for environment map blurring to avoid grain and produce really clean glossy reflections. Reflections glossiness samples were set to 0, that forces mental ray to render raytraced reflections without glossiness but the environment reflections and speculars still use the glossiness value.

All materials were Arch&Design, most of the surfaces done are basically plastic, chrome, rubber, glass, and the kind of materials you would find on sound devices.

Combining all the above mentioned produced the quality of the final image, since the time to deliver was short there wasn't time to render and assemble passes. Rendered frames only consist of the beauty pass and a zdepth element to produce depth of field in post and nothing more. By using the mr Photographic Exposure controls, half the image grading came straight out of the render.
Thanks to all the render optimizations available in mental ray the renders came out really quick. For example the image shown here took 1 minute 33 seconds to render at 720P. All the project was done in 1080P but it was just a bit more added to render time, it never went over 3 or 4 minutes per frame and we had about 30 shots to do.

Animation and Layout
Animation wasn't really an issue on this project, most of the shots consisted on camera travels and slight translations and rotations of the objects. Most of the optimization was on the scenes layout. The shots needed to be filled with speakers and have close ups of the objects. After an initial layout for a scene was set, and the camera motion was approved, the elements outside the camera field of view were deleted to save memory and keep the object translation to the renderer quick.

Referencing was used heavily, all the shots were assembled with xref objects of the original asset files, in the end all the files of each shot only had the camera in them, keeping filesize very light by not repeating geometry throughout the shots. Even the light setup was referenced just in case the client had some big change, everything would instantly update to all the already animated scenes.

Post Production

All the shot were put together in After Effects. The image sequences were rendered as Open EXR.

The Zdepth element was embedded with the beauty render. First step for each shot was to set and animate depth of field. We use Lenscare plugin for After Effects do to this.
A lot of the contrast achieved with mr Photographic Exposure looked very nice, only some subtile changes were made to balance contrast between shots. Using the same layer with different blending modes and opacities many looks can be created. To give an extra vignetting kick to the images a colored gradient was used, the center of the radial gradient was place on focus points of the image.
For the final touch i used Optical Flares Plugin to add some blinding light finish for the mood the client wanted. Each flare was also graded to difference the mic from the headphones from the boombox and etc..
That’s it for the process of this number. Many of the techniques discussed here we use very often to meet tight deadlines. 3ds max and mental ray have proven to us as very flexible tools suited for small and big studios equally.
Here is the final result.
Thanks for watching.
Cheers
Jeb.
Last year we did some background animations for Britney Spears Femme Fatale Tour, the first number we worked on was for the song Big Fat Bass.
Here is a quick explanation of the methods i used to get animations and renders done in a very short deadline time frame required by the client without loosing the quality and look expected for the show. We used 3ds Max 2011 with Mental Ray and After Effects CS5 through the whole process.
Modeling
Probably the most straightforward part of the process was the model assets creation. The client had very well defined what elements had to appear constantly throughout the number so most of the work was put into look developement. Some objects were modified from stock library and others were created specifically for the show, specially the sound panel Environment. Everything was handled as Editable Poly in Max.

Environment, Lights, Materials and Rendering
After the models were approved and ready, the look development process started. We needed to have the look of the overall piece done and agreed by the client before we could start to set up the final scenes. We needed really fast render times, and be able to manage the look in a very flexible way. Mental ray was the tool of choice because it allowed a lot of different “hacks” that produced really nice and fast images.
We didn't aim for Hyper Photorealistic images, but we also didn't want it to look like it was from 1980. We had to achieve a sweet spot between credible physical look and a fantasy sexy dreamy mood.
Probably the most useful trick to get fast renders was the ambient approach. I knew that lighting a scene with final gather would slow the process because of the FG map precalculation, so i used ambient occlusion shaders to simulate the effect that final gather would give for ambient lighting.
The technique is not known by many people but it is used by some. Here is a video explaining how to fake ambient lighting in 3ds Max with ambient occlusion. Basically you put an ambient occlusion shader on a standard omni light as a projector map or a mr light shader so you globally add ambient occlusion to your scene and illuminate the ambient with the bright color slot of the ambient occlusion shader. Its a nice method to add fast ambient lighting to the scene but it can be really flat and boring compared to what you get with final gather, so i expanded the idea a bit to give it more tones of ambient color with an hdr as one would do with final gather.

Instead of just adding the ambient occlusion shader to the light i used a composite map to blend two different occlusion shaders. The first one creates the ambient light colors and no occlusion shadows. The second one is a regular ambient occlusion shader used to produce shadow on contact areas.
The trick for the first occlusion shader to only produce ambient lighting color is to set its samples and spread to 0.0 and the max distance value to the minimum possible but not 0.0. Inside the bright color slot i added an hdr image, that image was a regular map that one would use for reflections but blurred with hdr shop Diffuse Spherical Harmonics plugin to make it really smooth and still perfectly spherical without seams. When used as Spherical Environment it produces ambient illumination very similar to final gather but without bounces and extra calculation time, also no flicker.
When you multiply the second occlusion shader over the first inside a composite map and plug that to the ambient light you get the full effect of hdr colored ambient light with occlusion shadows. Last step was to add the key light and some little red lights for the little bulbs on some objects. Parameters for the keylight are simple, just a regular omni light that uses area shadows and has some decay.

The same environment image but without blur was used for reflections. To get the most out of it, and to get reflections to work really fast, i limited the ray distance. That way objects reflect other objects that are only close and if there is nothing else beyond that distance it reflects the hdr environment map.

When using reflection glossiness, hdr maps tend to cause a lot of grain. The environment blur shader was used to avoid that. It blurs the environment image to avoid grain, but it does that taking into account the amount of glossiness the material has, so it is a global solution for environment map blurring to avoid grain and produce really clean glossy reflections. Reflections glossiness samples were set to 0, that forces mental ray to render raytraced reflections without glossiness but the environment reflections and speculars still use the glossiness value.

All materials were Arch&Design, most of the surfaces done are basically plastic, chrome, rubber, glass, and the kind of materials you would find on sound devices.
Combining all the above mentioned produced the quality of the final image, since the time to deliver was short there wasn't time to render and assemble passes. Rendered frames only consist of the beauty pass and a zdepth element to produce depth of field in post and nothing more. By using the mr Photographic Exposure controls, half the image grading came straight out of the render.
Thanks to all the render optimizations available in mental ray the renders came out really quick. For example the image shown here took 1 minute 33 seconds to render at 720P. All the project was done in 1080P but it was just a bit more added to render time, it never went over 3 or 4 minutes per frame and we had about 30 shots to do.

Animation and Layout
Animation wasn't really an issue on this project, most of the shots consisted on camera travels and slight translations and rotations of the objects. Most of the optimization was on the scenes layout. The shots needed to be filled with speakers and have close ups of the objects. After an initial layout for a scene was set, and the camera motion was approved, the elements outside the camera field of view were deleted to save memory and keep the object translation to the renderer quick.

Referencing was used heavily, all the shots were assembled with xref objects of the original asset files, in the end all the files of each shot only had the camera in them, keeping filesize very light by not repeating geometry throughout the shots. Even the light setup was referenced just in case the client had some big change, everything would instantly update to all the already animated scenes.

Post Production

All the shot were put together in After Effects. The image sequences were rendered as Open EXR.

The Zdepth element was embedded with the beauty render. First step for each shot was to set and animate depth of field. We use Lenscare plugin for After Effects do to this.
A lot of the contrast achieved with mr Photographic Exposure looked very nice, only some subtile changes were made to balance contrast between shots. Using the same layer with different blending modes and opacities many looks can be created. To give an extra vignetting kick to the images a colored gradient was used, the center of the radial gradient was place on focus points of the image.
For the final touch i used Optical Flares Plugin to add some blinding light finish for the mood the client wanted. Each flare was also graded to difference the mic from the headphones from the boombox and etc..
That’s it for the process of this number. Many of the techniques discussed here we use very often to meet tight deadlines. 3ds max and mental ray have proven to us as very flexible tools suited for small and big studios equally.
Here is the final result.
Thanks for watching.
Cheers
Jeb.
Great post, very informative. Thanks Jeb
ReplyDeleteThanks Jake, im glad you find it useful.
DeleteThat was amazing!, but you talked about you work in some background animations for Britney Spears and Femme Fatale Tour, what were the other animations, and other question; Do you have the final cut with Will.I.Am sang parts?. Will we have the full version soon?
ReplyDeleteCan you please answer my questions to webmaster@britney-online.net. I'm going to write an article in my website http://britney-online.net/ about the process making this video.
Hi Ismael.
DeleteYeah i worked on 3 Backdrop animations for that tour. The others are "If you seek Amy" and "Burning Up". We will upload a show visuals reel as soon as we can on our studio site www.wearebot.com
If you follow our facebook site then you will certainly know about it as soon as it is up.
Thank for checking out my work and for taking time to spread the word. we rally enjoyed working on those projects and hope someday more of them come up.
cheers
This comment has been removed by the author.
DeleteIt would be great if you could upload the backdrops of Britney Spears' Femme Fatale tour. They are so awesome.
ReplyDelete